SOCIAL MEDIA

Love List

Wednesday, July 8, 2015

Big Hair Days with John Frieda Luxurious Volume Range

John Frieda Volume nakedgloryvera-16 John Frieda Volume nakedgloryvera-14 John Frieda Volume nakedgloryvera-17

Who says short hair girls can't have big hair?

I’ve always loved hair with a bit of texture and volume, which explains why I’ve never rebonded my hair. I feel that texture gives the hair more movement and a more natural look, both on the go and on the red carpet. I used to have long, wavy hair, which looks very luxurious when offset with fitted dresses for events, but since I’ve cut my hair short for 2 years, I’ve still paid attention to creating volume in my hair – it just adds an extra oomph to your whole look, especially when you’re walking down the streets and your hair moves and sways together with you.

The bob style is extremely easy to carry off volume, especially when you curl them in at the ends, or in general when you twist dry it or curl small sections of it to create a wavy bob. But for us straight hair girls, it's also kind of a pain to achieve; very often I find myself waking up with completely flat hair, especially at the crown, since my hair is really fine. And then I'll have to spend the next 10mins blowdrying and curling in the ends to create the volume = me being always late.


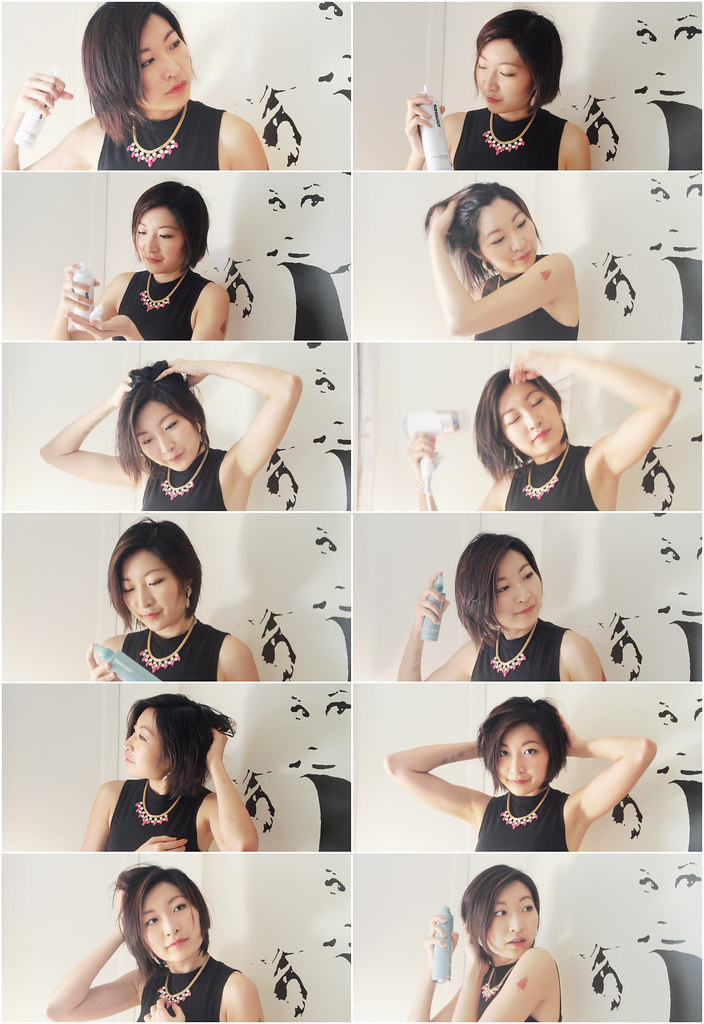
That's why I've decided to put John Frieda's newest voluminizing range of haircare products to the challenge and put together the steps below to achieving a voluminous crown of hair.

John Frieda
5 Steps to Luxurious Volume Hair
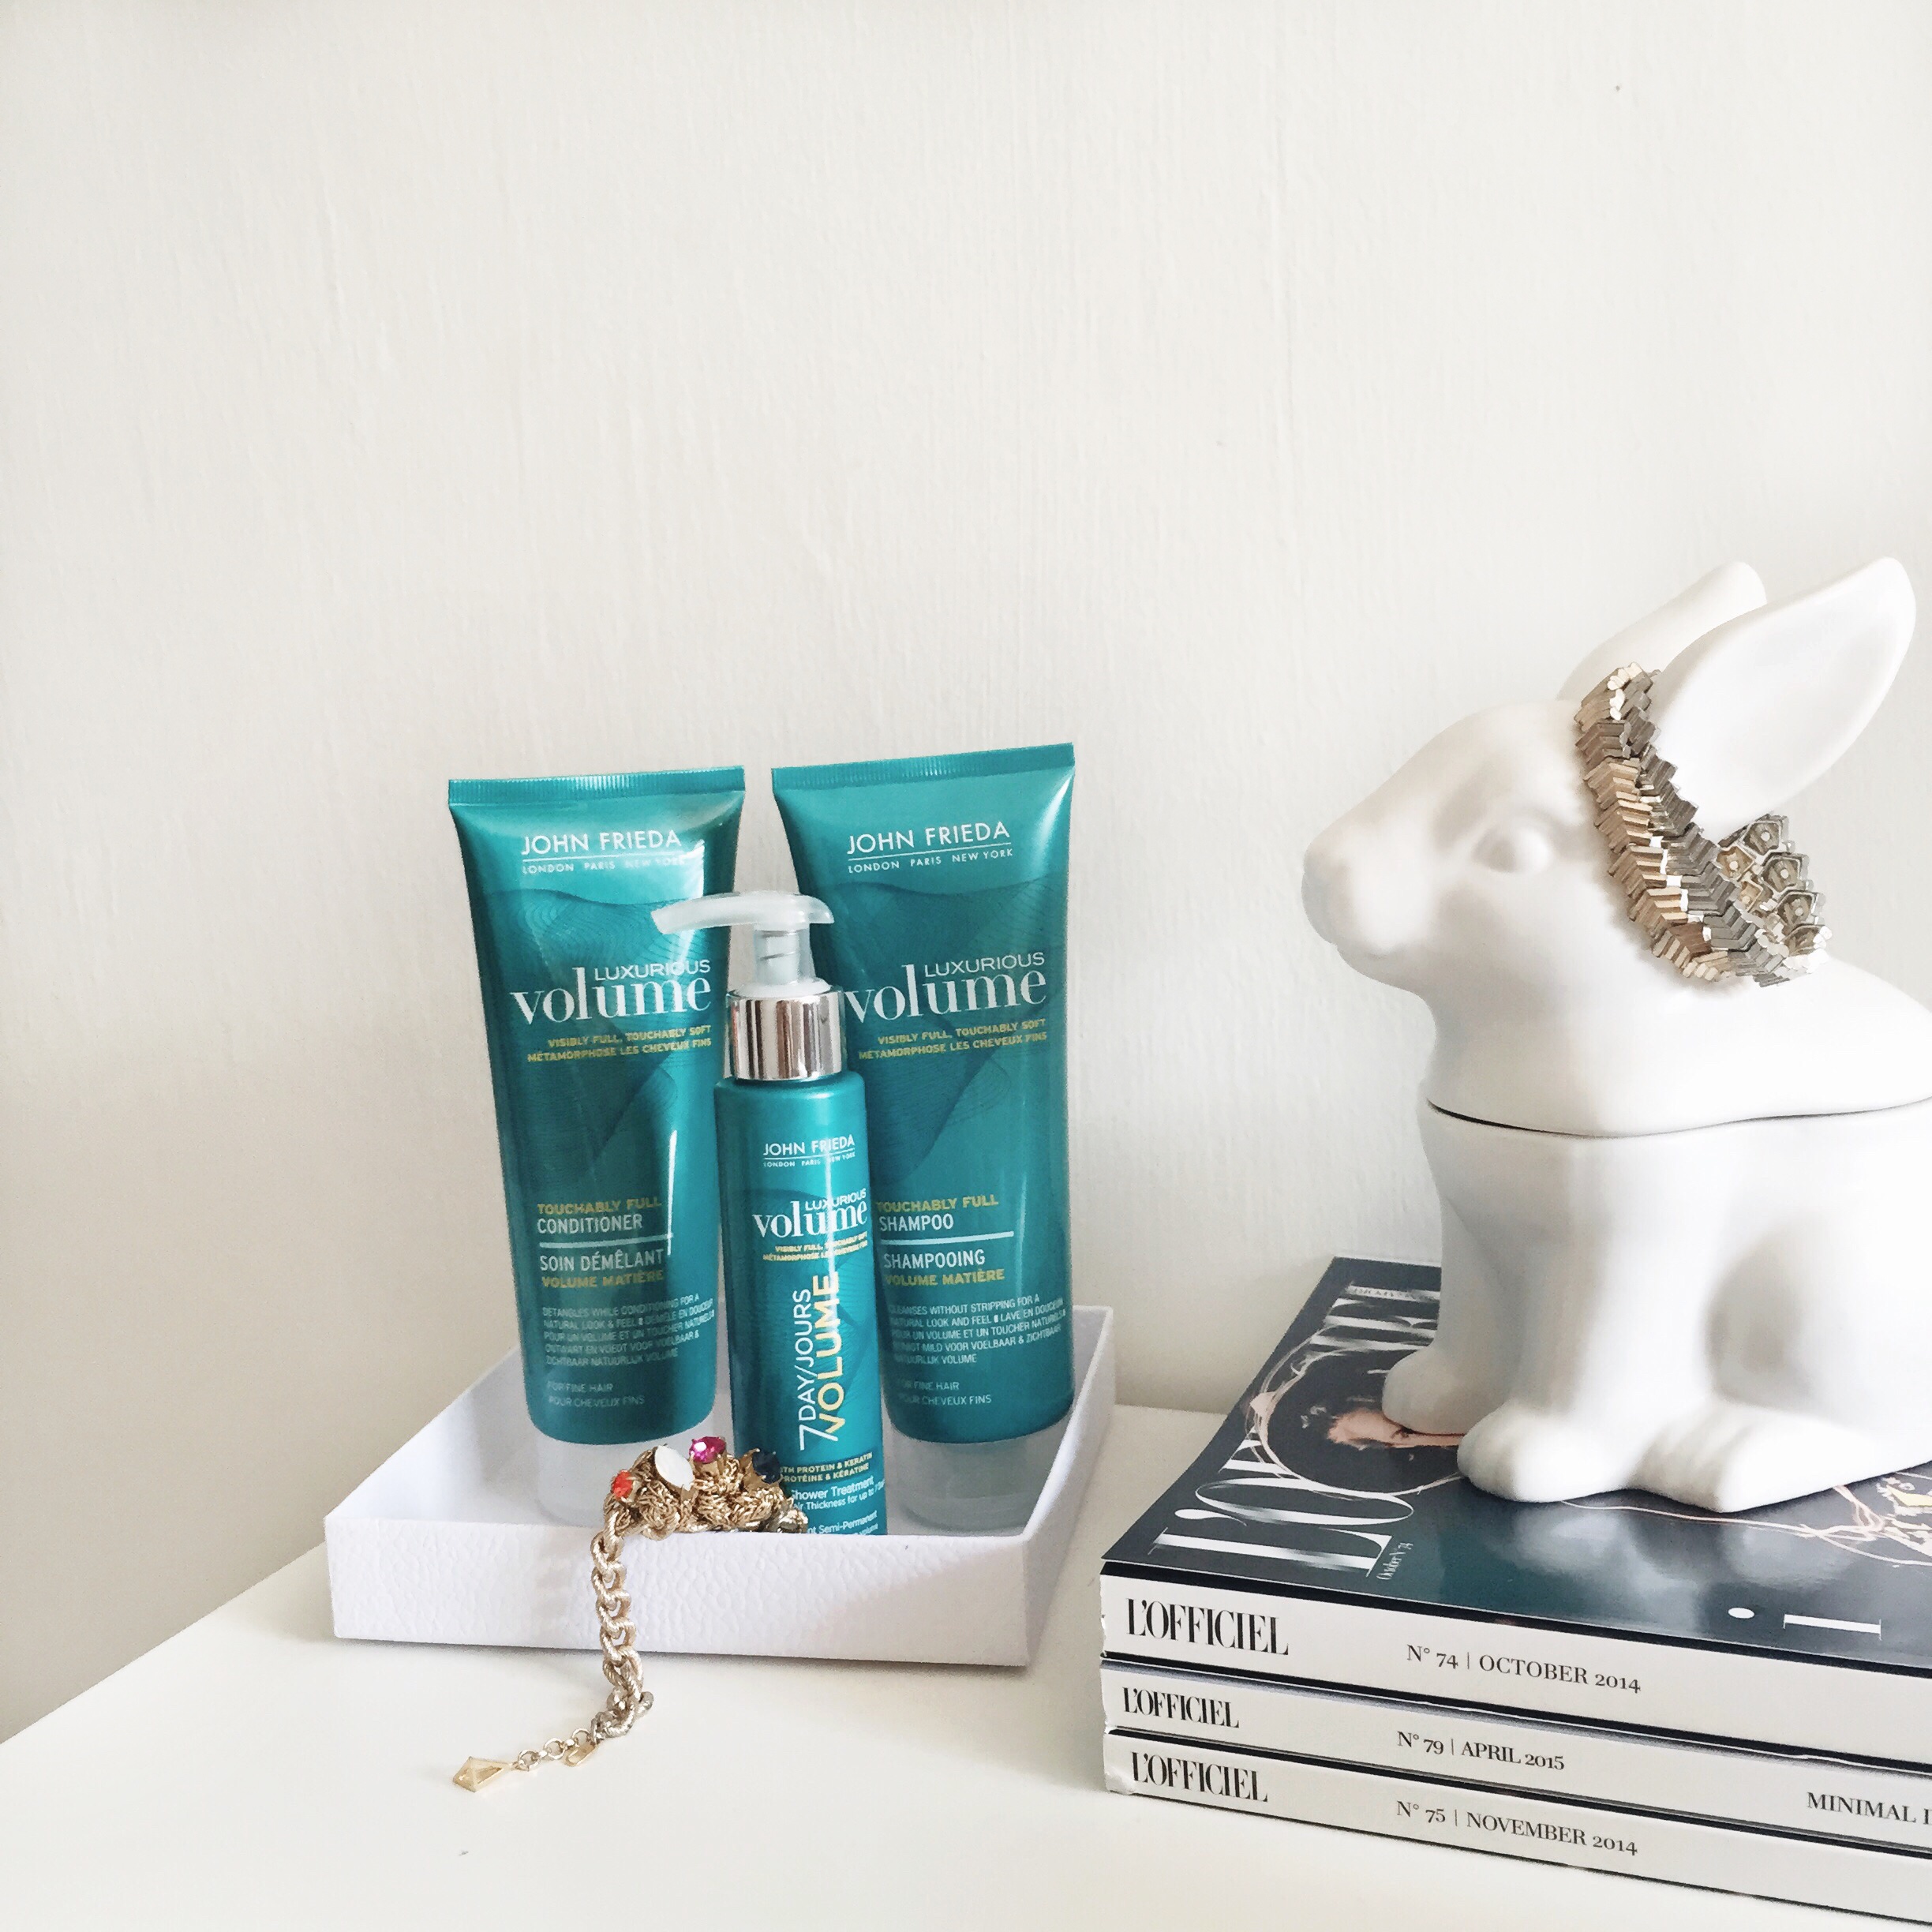
  1. Shampoo and condition with John Frieda Luxurious Volume range.
  2. Apply 3-4pumps of John Frieda 7 Day Volume In-Shower Treatment, leave on for 3-5 minutes then rinse out.
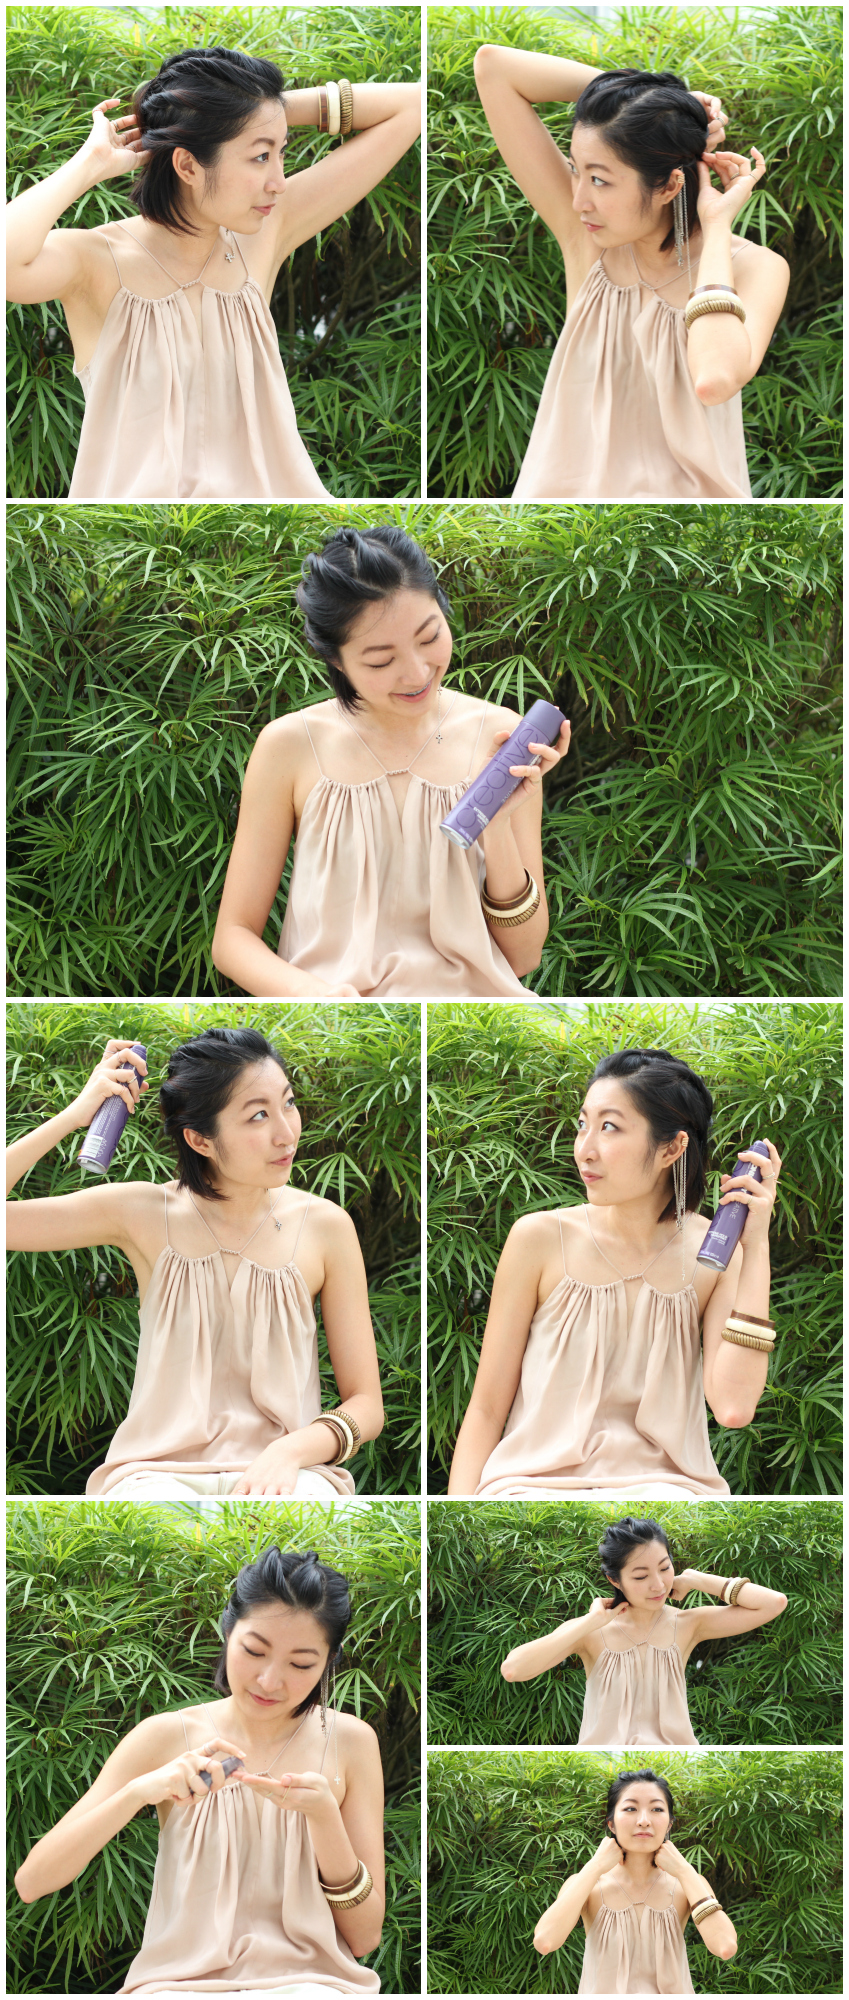
  3. When blow drying, use a round boar bristle hairbrush to lift your hair up at the roots and blow dry the crown first. Use a curl in motion using the round brush to lift up your roots and aim your hairdryer at a 45 deg angle at the brush, instead of directly on top or in front of it.
  4. If you have really fine hair which tends to get oily, you can spray a little bit of dry shampoo at the roots, which will serve to give it more volume as well.
The in-shower treatment is the one that does most of the work for voluminizing. Its formula creates texture by building a polymer network onto hair fibres, hence giving your hair with added texture to build atop each other. The result is light, bouncy hair, which feels fuller, especially when I blow dry my hair right after applying the treatment.

John Frieda before after 
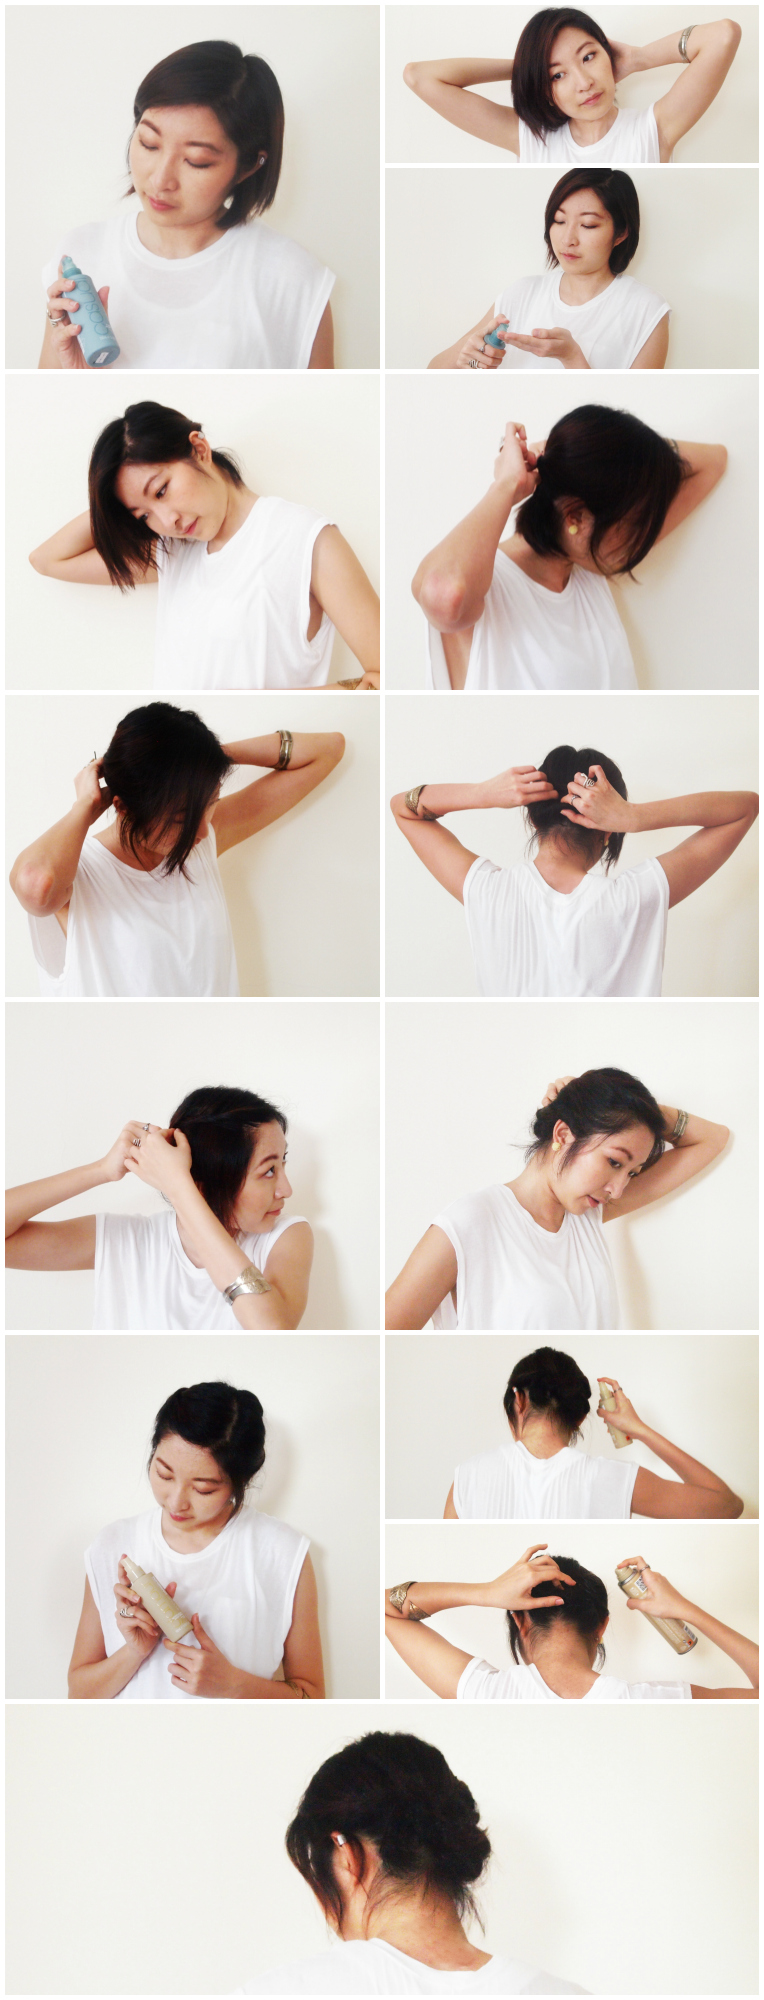
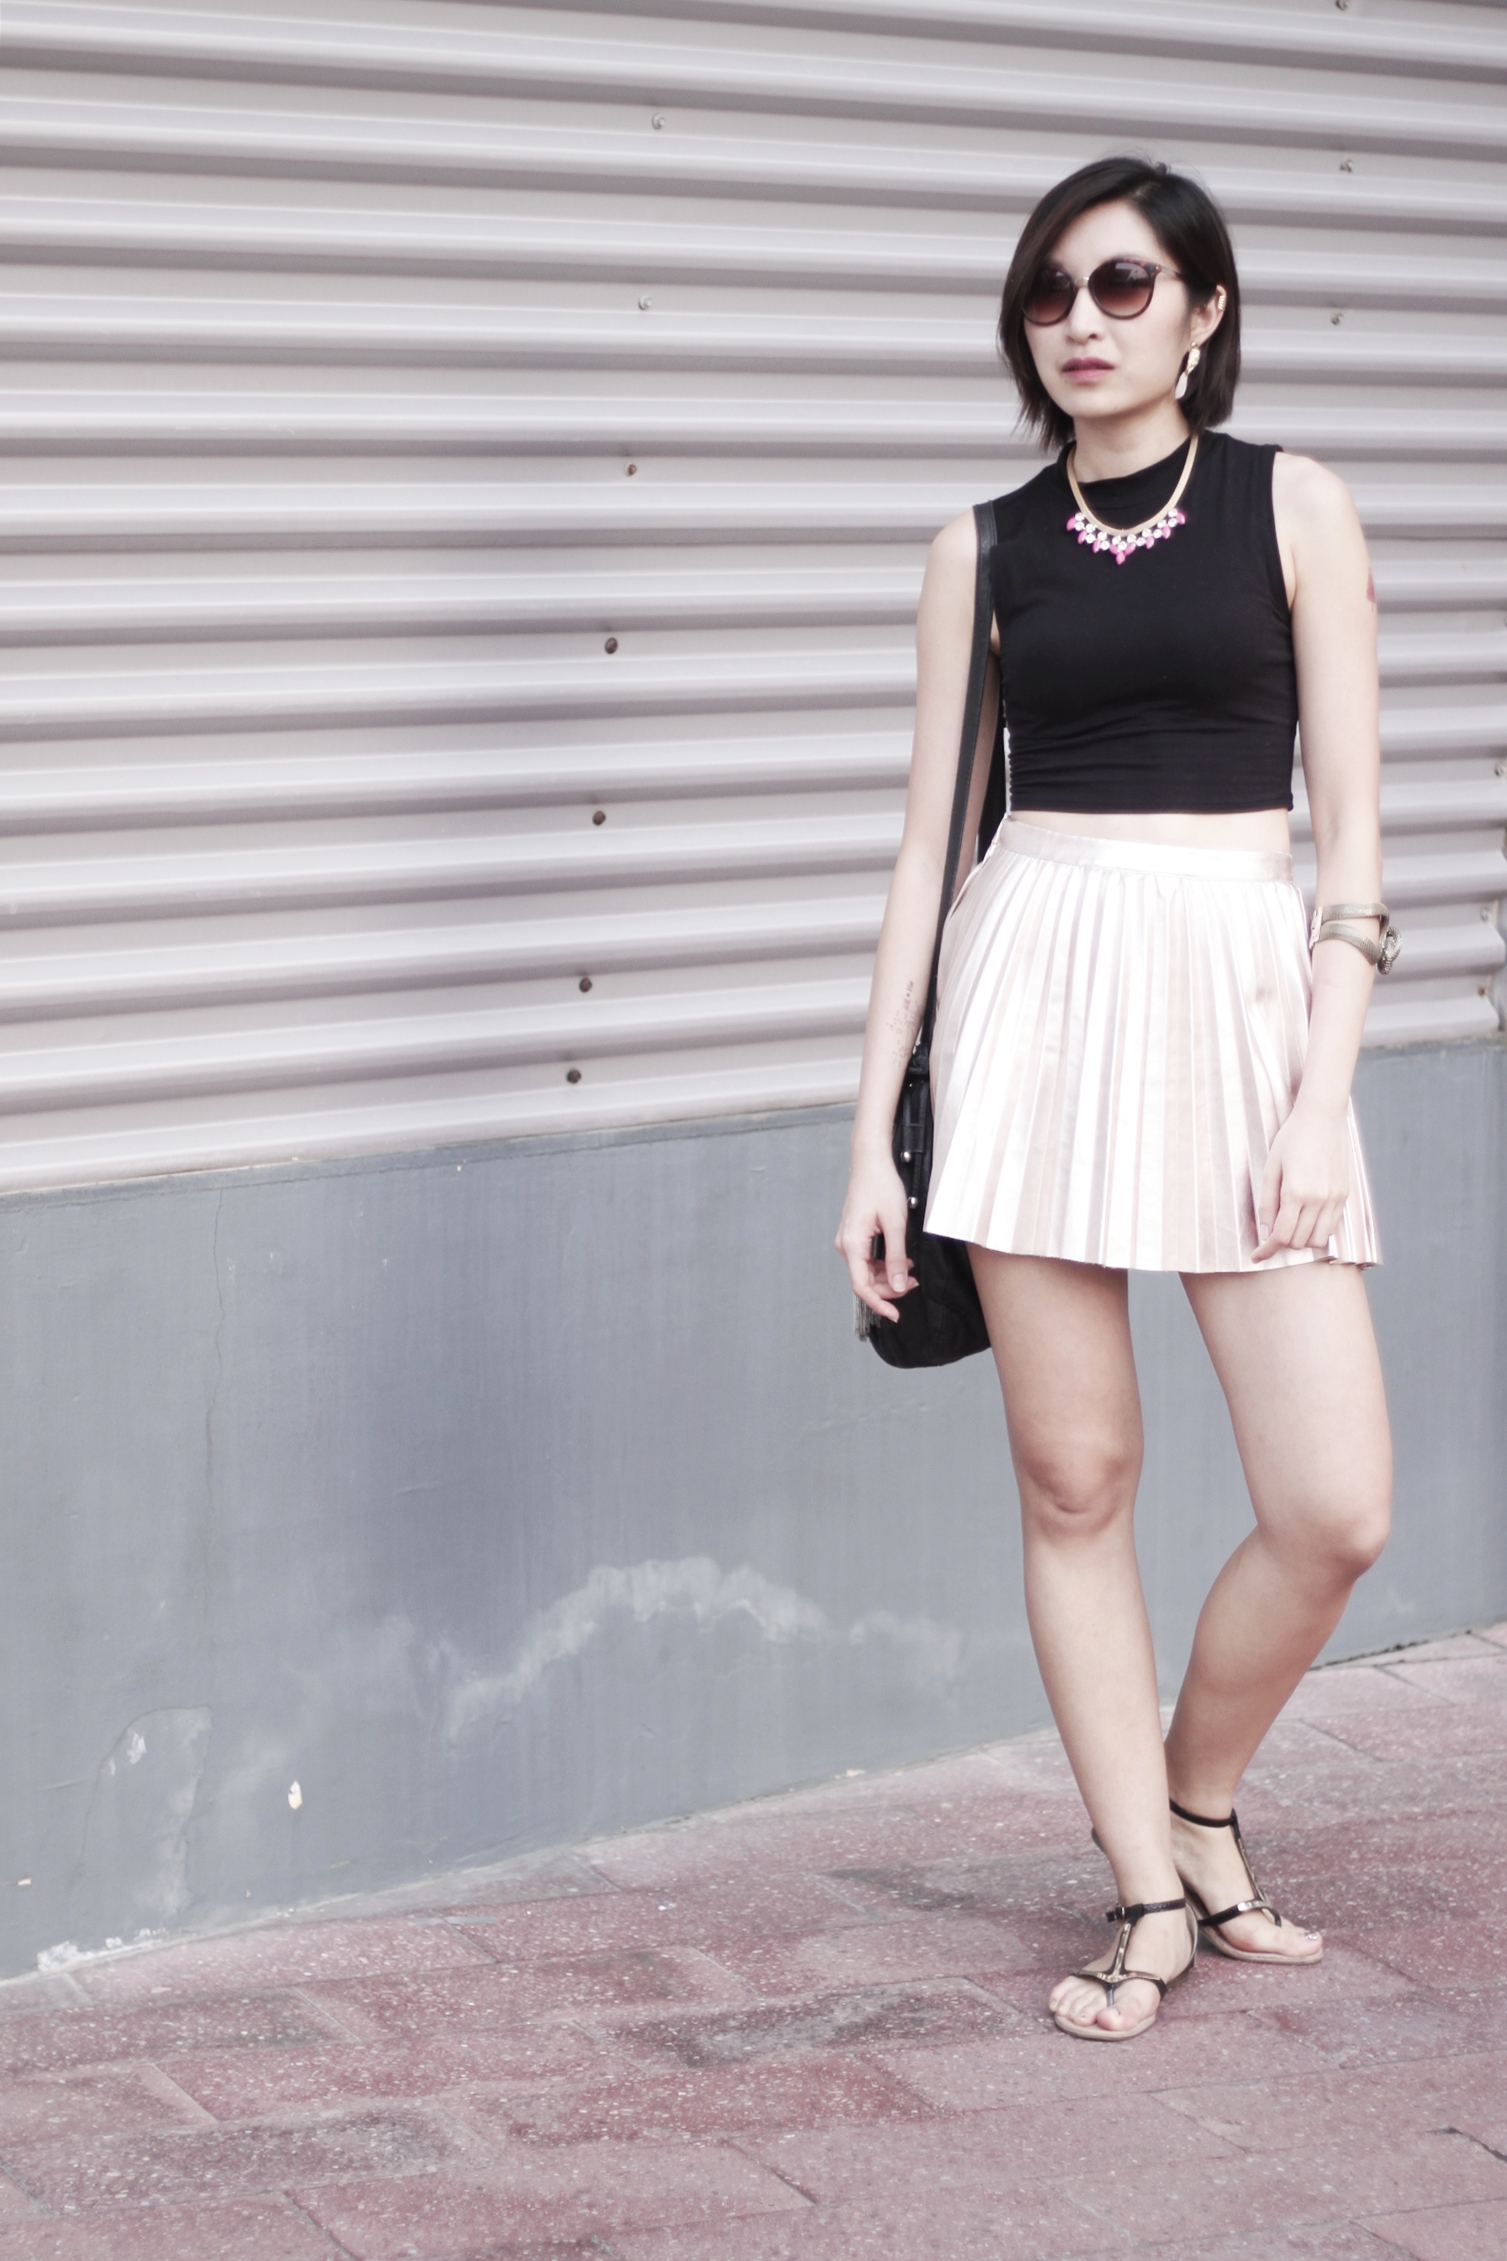
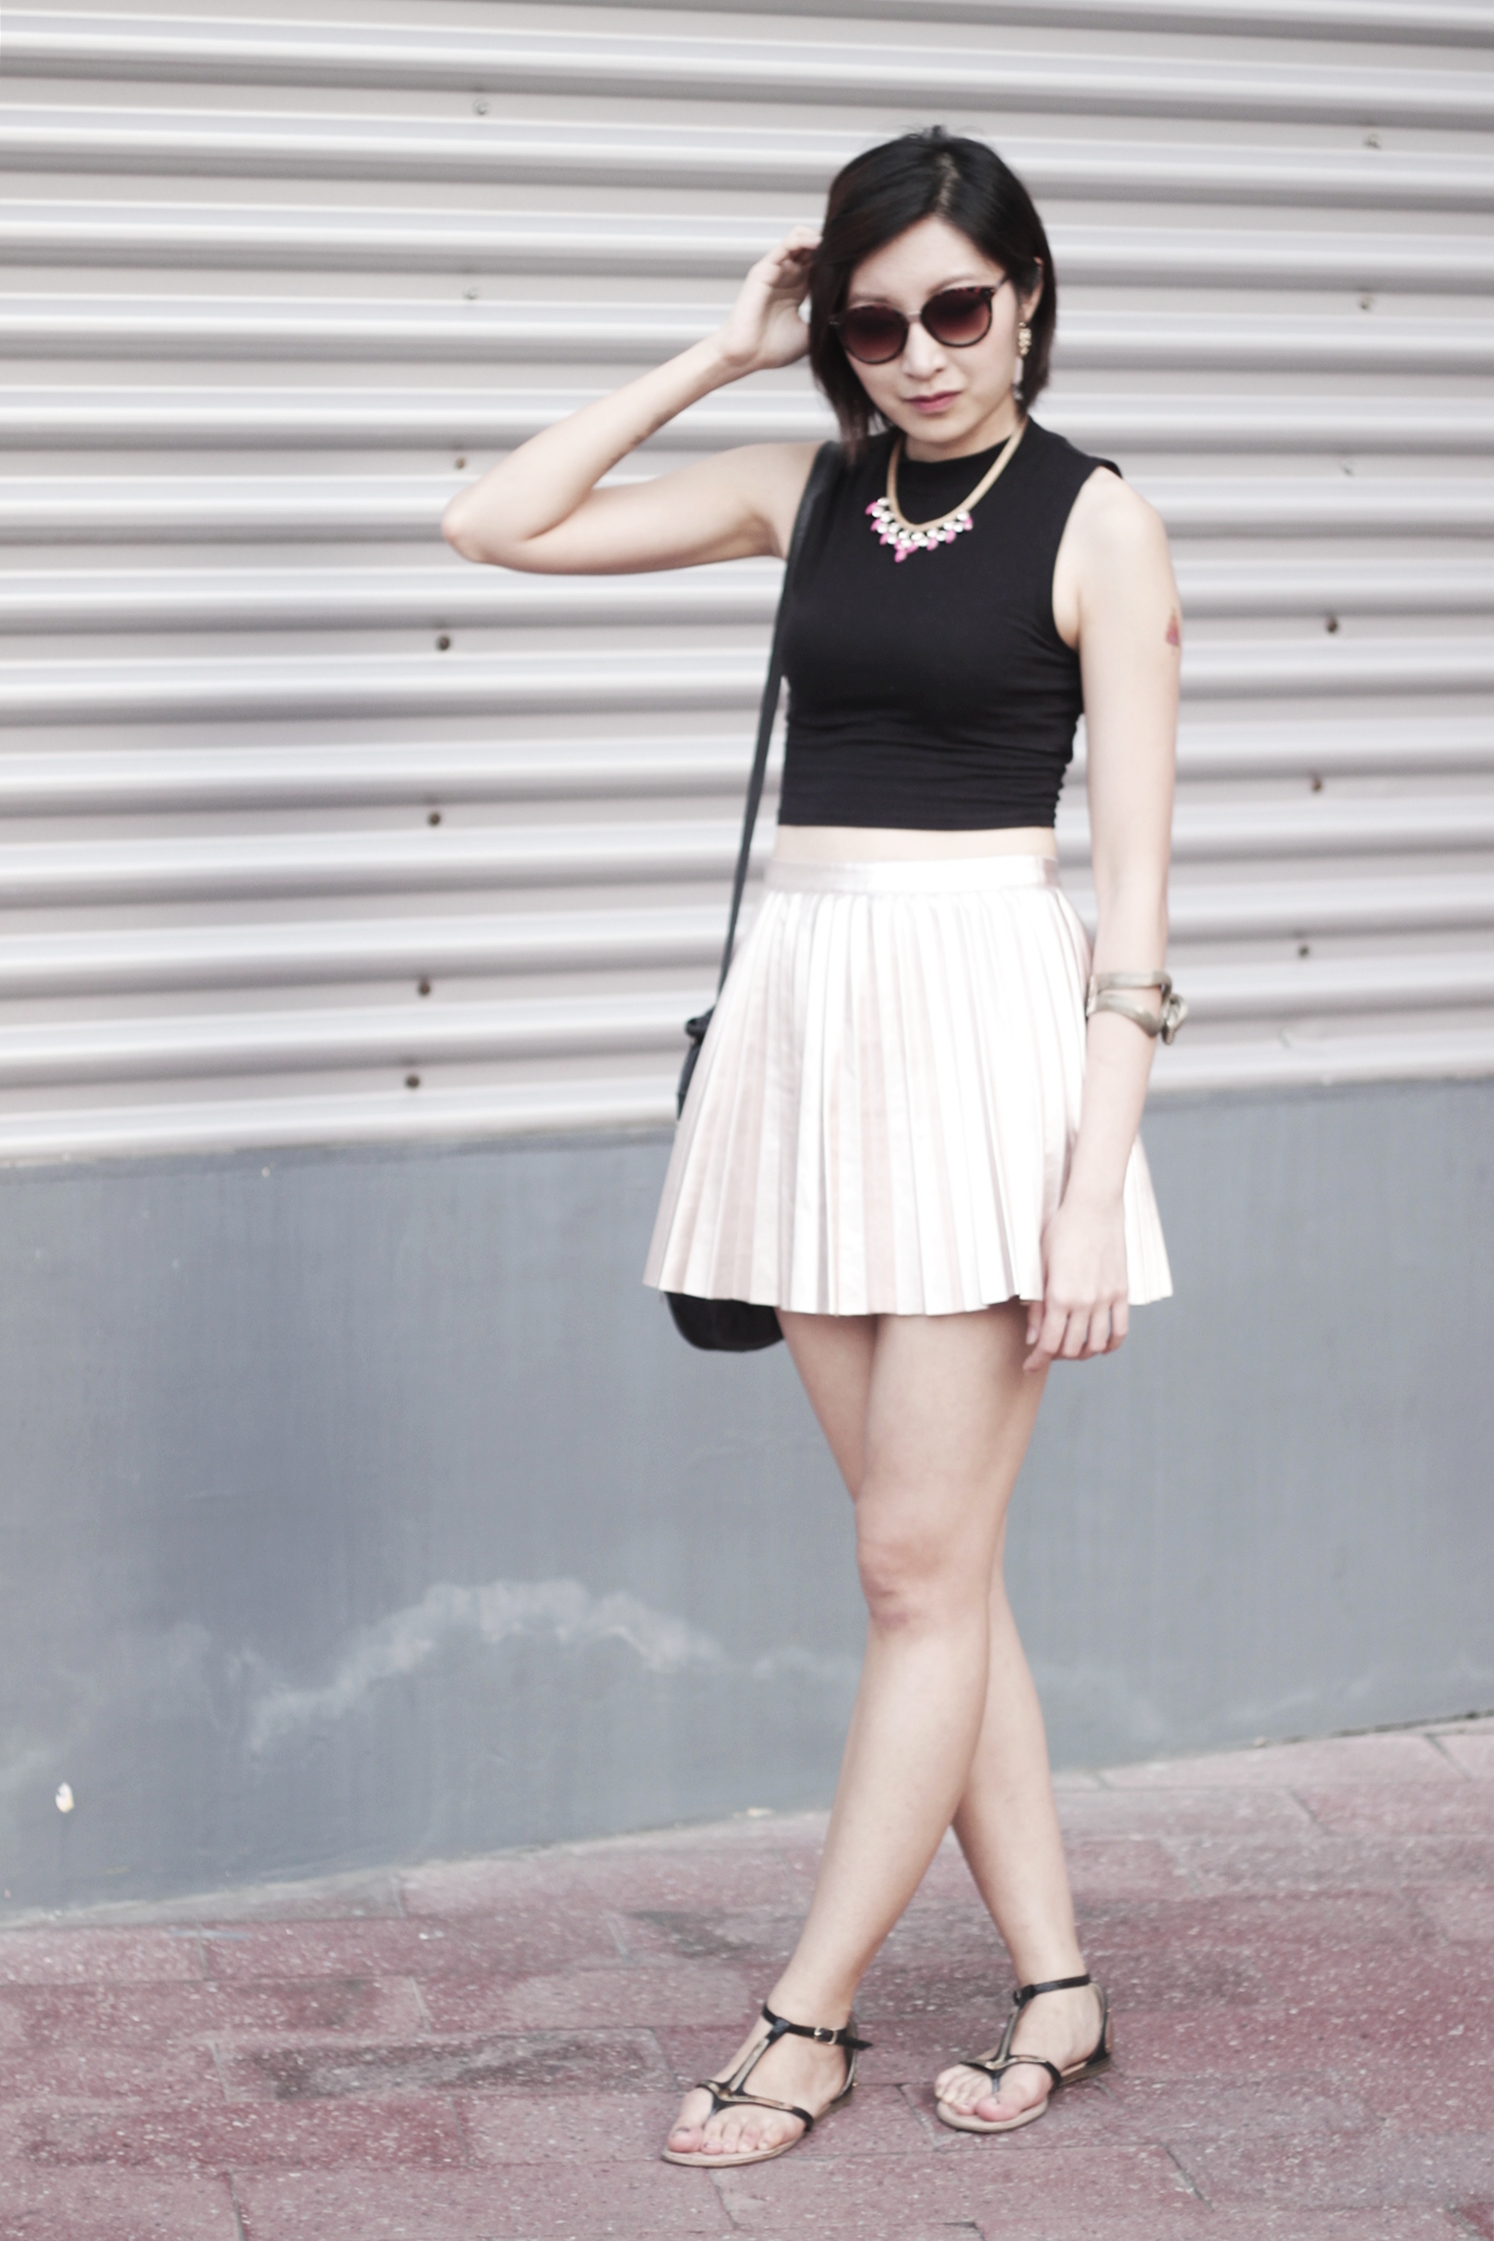
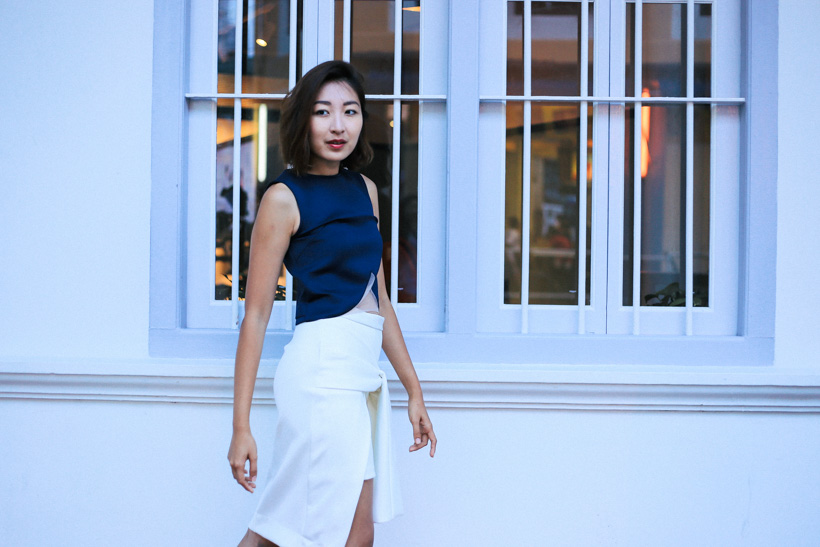
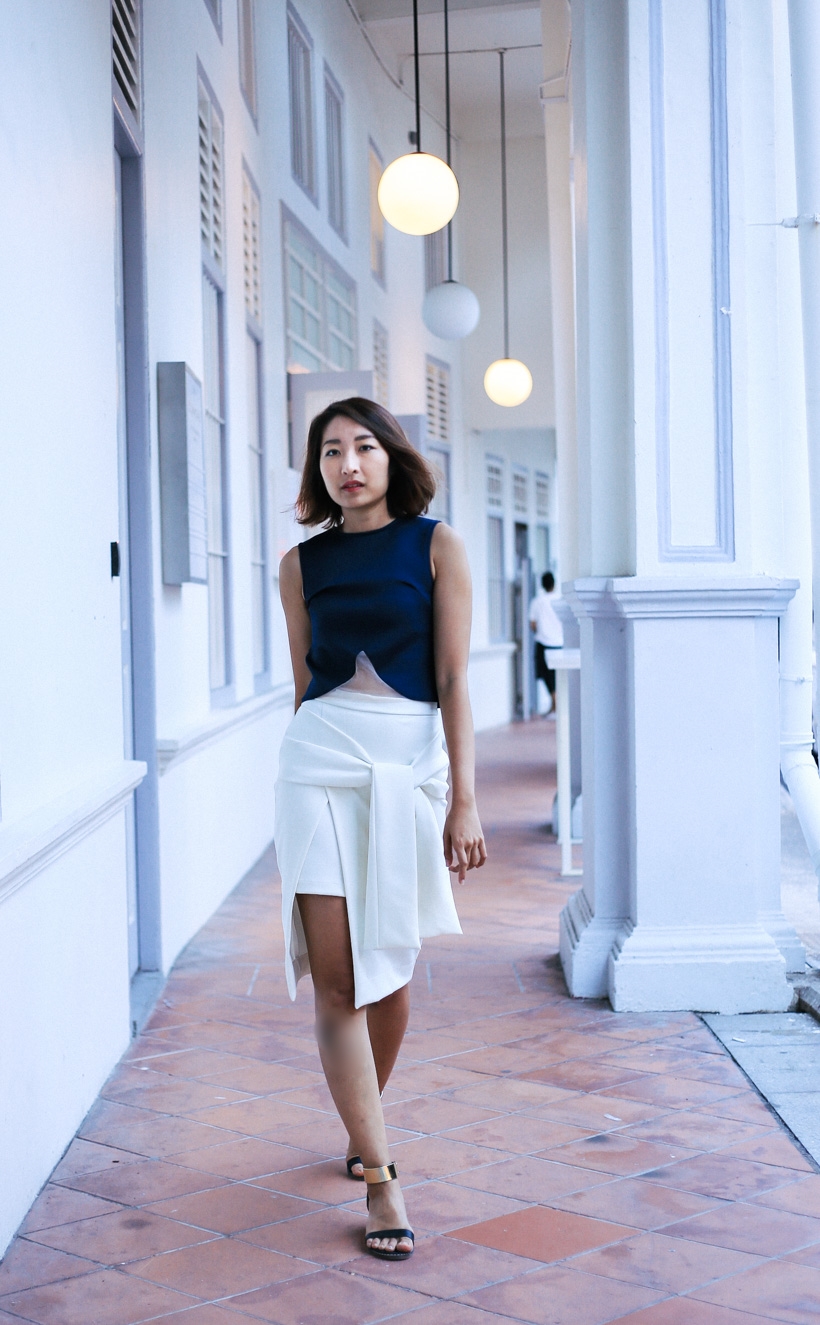
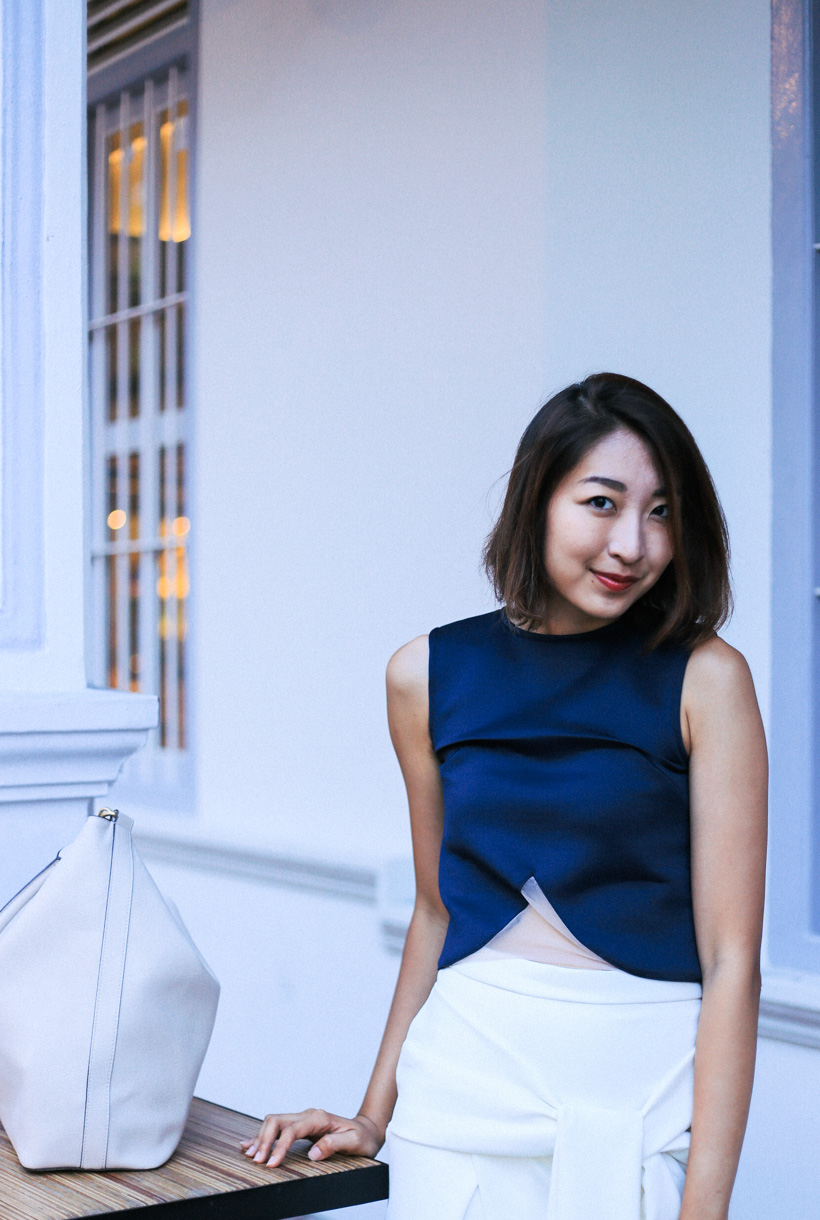
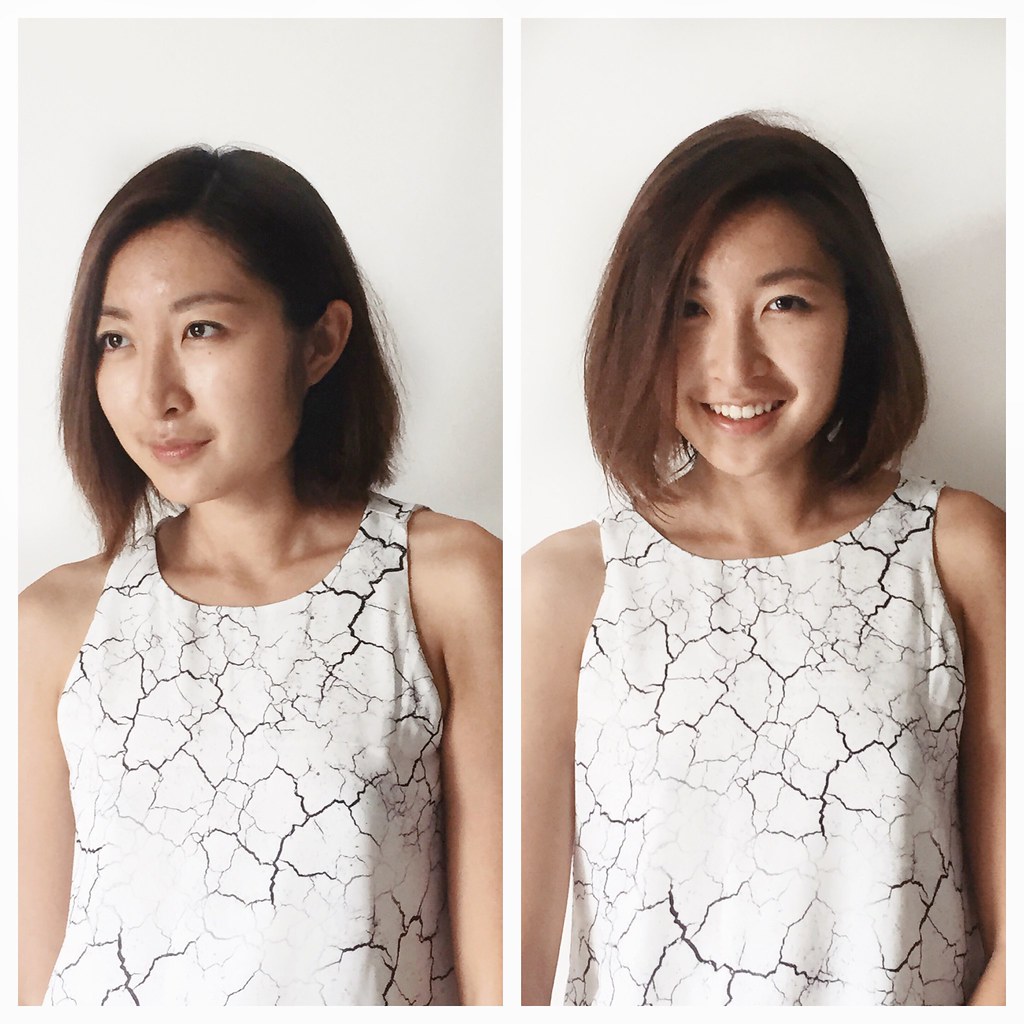
Here’s the before and after photos. I tried to make it easy to compare by wearing the same top and shooting against the same wall in the photos. Before, my hair was easily super flat and straight – basically just hanging straight down from the roots. Obviously, you can see a lot more volume in the After photo, especially at the root area. When I was blowdrying, I could feel that my hair had a thicker texture, and felt more full, making it easier to further style my hair to maintain this curvy bob look.

This treatment lasts for about 3 washes for me, but according to John Frieda, it would last up to 7 days, depending on your original hair condition and texture.

For more info please visit John Frieda on their site here, and like them on Facebook

Disclosure: The above content was sponsored by John Frieda but all views are my own.

Wednesday, October 16, 2013

London Fashion Week makeup look with Zao Cosmetics

London Fashion Week has just passed by in the blink of an eye and it was a flurry of shows packed back-to-back every hour. Makeup has became routine for me during the 3 days when I attended fashion week and I always do roughly the same look - A brown/dusty purple smokey eyeshadow finished off with cat eye traced in black eyeliner.

I guess for me, that's my go-to look. I'm really quite boring when it comes to makeup, but this look really works for me and I like how easily I can dress it up or tone it down (by skipping the darker shades and metallic shadows). So, I'm going to show you how I do it.

P9017123 P9017126_ Zao Cosmetics natural makeup look  
For eyes,
  • Apply a light brown or cream color all over your eyelids as a base color.
  • Apply Zao Cosmetics Eyeshadow in Pearly Garnet on the outer corners of your eyes and blend upwards to form a slight horizontal V shape. Its eyeshadows contain rice powder, which eliminate fat from the skin by adjusting sebaceous secretion.
  • Apply a medium brown, light earth gold, or a metallic/shimmery eyeshadow in the middle of your eyelids and blend in with the dusty purple shade.
  • Finally, dab a light cream or silver eyeshadow on the inner corners of your eyes.
  • Finish off with eyeliner and mascara.
Zao cosmetics lips i For lips,
  • Apply Zao Cosmetics Lipgloss in Brown (1).
  • Trace the outline of your lips with Zao Cosmetics Lip Pencil in Orange Brown (2) and then blend with the lipgloss. The lip pencils have added shea butter in them to keep your lips moisturized throughout the day.
P9207984 Zao cosmetics i For face,
  • Then, apply Zao Cosmetics Blusher in Brown Pink (1) on the apples of your cheeks, which is a warm beige peach color that gives my cheeks a natural glow.
  • Using a kabuki brush (I'm using Zao Cosmetics' soft and handy kabuki brush), apply Zao Cosmetics Mineral Silk in Clear Beige (2) all over your face, concentrating on the cheekbones, jawline and nose bridge. 
  • The loose powder feels very lightweight and gives my skin a satin-like, natural finish. It also contains organic silica from bamboo, which is a component that helps in regenerating collagen and elastin to enhance skin elasticity
Since I've started on my "programme" for clear skin as prescribed by my dermatologist, all my clogged pores did all clear up. However, it also left me with slightly more sensitive skin, and so now I'm quite selective to the type of makeup and other facial products that I use.

Zao Cosmetics takes away all my worries of having clogged pores away as it is developed from 100% natural formulas enriched with fair-trade, organic ingredients. I was very amazed to learn that even its pigmented products like eye shadows, blushers and lipstick were also made from natural plant pigments. It does not contain any of the typical petrochemicals or preservatives in usual cosmetics products, such as paraben, phenoxyethanol, mineral oil, paraffin, DTA, BHT and BHA. Its packaging is also made from bamboo, which is all biodegradable and refillable.

Its range is not only perfect for people with sensitive skin, but also great for people with acne prone skin because its products will not clog your pores, even if you sweat in them.
The full range of Zao Cosmetics products can be found at Origo Creations' outlets below:

International Plaza
10 Anson Road, International Plaza, #02-87, Singapore 079903.
Orchard Central
181 Orchard Road, Orchard Central, #01-17, Singapore 238896.
Chinatown Point
133 New Bridge Road, Chinatown Point, #01-37, Singapore 059413
The Adelphi
1 Coleman Street #04-50
Singapore 179803

My readers get a 15% disucount all regular priced items (except tea, accessories, CDs and supplements) when they quote "NAKEDGLORYVERA" to any of the staff members instore.
Wednesday, August 21, 2013

Les Filles des Fleurs - A DIY Floral Crown Party

Photo 9-8-13 12 34 32 AM Photo 8-8-13 8 59 17 PM DIY floral crown i Photo 8-8-13 8 52 48 PM Photo 8-8-13 9 05 14 PM

A long weekend calls for a picnic and some green fingers. I gathered my best girl friends over the recent 4-day long weekend for a wonderful get-together over simple food, flowers and some craft to make our own DIY floral crowns.

The result was a wonderful girly afternoon spent listening to some indie folk music, sniping off blooms and then gathering then into small bundles to be made into a glorified crown that attracted the attention of all passer-bys at the Botanic Gardens.

Floral crowns are heavily marked up in the market - they usually go for at least $35 and above for a simple crown of fresh flowers - which I find rather ridiculous. The truth is, with a bit of time, you can get these DIY'ed for just less than $5 per crown.

DIY floral crown ii P8086985 1097165_10153067094810401_353659891_o Photo 9-8-13 6 29 12 PM

Materials Needed:
  • Thick malleable craft wire - Daiso, $2
  • Floral Tape - Artfriend, $2.20
  • Floral Wire - Artfriend, about $3
  • Loose flowers with stem cut off, and some others with stem - Wet market, $11 for everything
  • Sharp scissors
  • Pliers (to cut the craft wire)
Instructions:
  1. Measure the thick craft wire to the circumference of your head, with a bit of excess. Snip off the length and then bend and create two hooks to hook the wires together. 
  2. Start creating small bundles of flowers however you wish, by sniping the flowers off with about 3" stem attached, and then securing the bundles together with floral tapes.
  3. Make 10 - 12 bundles of flowers or however as deem fit. Thicker bundles will result in your crown looking thicker.
  4. Secure the bundles of flowers onto the thick craft wire with the thin floral wire, with the flowers facing all in one direction
  5. You're done! Take lots of pretty photos now :)
Note: You can buy bigger blooms such as dahlias, garden roses or even peonies to make the crown look much bigger and thicker. It is also necessary buy small blooms such as forget me nots and baby's breath, or smaller flower buds to supplement the bigger blooms.

For a more comprehensive tutorial, please refer to the one I used from Design Sponge. Enjoy!
Friday, July 26, 2013

Mini twist braids short hair tutorial - TONI&GUY Hair Meet Wardrobe Creative

Twisted braid short hair tutorial

Tools of the Trade:
1. Prep - Volume Plumping Mousse
2. Creative - Extreme Hold Hairspray
3. Classic - Shine Gloss Serum

  1. After blow-drying your hair, apply Volume Plumping Mousse thoroughly to the roots of your hair (as usual).
  2. Backcomb your hair to give it some more volume and texture so that your bobby pins will hold more easily later on when you twist all your hair into small braids. 
  3. Start from the center of your head and then work to the sides, twisting small braids and then pinning them down with bobby pins.
  4. Secure the look with generous sprays of Extreme Hold Hairspray - this hairspray is really effective in helping you hold your look throughout the day; great for dramatic hairstyles!
  5. Finally, apply a few drops of Shine Gloss Serum to the ends of your hair to help control frizz and boost your hairstyle with some extra shine!
And that marks the end of my four part series with TONI & GUY! Thank you everyone for all your support in voting for me, and for following me throughout this journey! :)
Tuesday, July 23, 2013

Faux Updo for Short Hair Tutorial - TONI&GUY Hair Meet Wardrobe Glamour

Faux updo for short hair tutorial 2

I'm finally going to reveal how I make a faux updo from short hair! This is great for formal occasions, or simply when you want to change up your look.
If you try this out, please let me see your results on Instagram by tagging #verafauxupdo!

Tools of the Trade (in order of sequence):
1. Prep - Volume Plumping Mousse
2. Casual - Forming Spray Gel
3. Glamour - Moisturising Shine Spray
4. Glamour - Firm Hold Hairspray

  1. As always, towel dry your wet hair, then apply Volume Plumping Mousse generously to the roots of your hair to give your hair some volume and definition for styling later. 
  2. Apply Forming Spray Gel to the ends of your hair, where you will be twisting into a faux updo later on. You can either spray the gel directly onto your hair, or spray them onto your hands first and then applying them onto your hair. The gel enhances your hair layers for texture, on top of giving your hair some flexible hold and movement, that will make your hair easier to work with. 
  3. Using bobby pins, take sections of your hair and twist them inwards, tuck them in and then pin down. Work around half of your head first and then move on to the other side. The trick is to twist the hair inwards to make it look like a bun of sorts. 
  4. Leave the fringe for the last and twist them away from your face. 
  5. Tuck any excess baby hairs or loose strands at the back into the twist. Secure with extra bobby pins. 
  6. Apply Moisturising Shine Spray to give your hair some natural shine and long-lasting smoothness.
  7. Finish off with Firm Hold Hairspray generously, especially over the twist. This hairspray provides you with firm, staying hold without stiffness that makes it ideal for updos. 
Let me know if you have any questions with regards to this tutorial and I hope you try this out! 

Tuesday, July 2, 2013

Styling Short Hair - TONI&GUY Hair Meet Wardrobe Classic

IMG_4087_edit IMG_4077 T&G Classic look IMG_4091 IMG_4151 IMG_4122 IMG_4115
Wearing American Apparel Long Sleeve Crop Top, OwnMuse Highwaist Maxi Skirt, Dorothy Perkins Hydrangea Print Court Heels, Mint Jewel Necklace c/o Curated Editions
Photos by Gwen Janelle
A lone girl crossing a deserted street with a purpose. She's exploring, searching, playful yet cautious of her surroundings. Where are these people on a hot Sunday afternoon? Maybe they're strolling along the corridors of air-conditioned malls, and come Monday, they'll all be back to pound these streets again.
What is a classic hairstyle? To me, that is something that will never go out of trend and is able compliment almost everyone. For long hair, that's easy - braids, chignons, top knots, bouffant/beehive and ponytails come into mind. But for short hair, not so easy. After all, there are very limited things you can do with short hair.

For this second installation of  TONI&GUY Hair Meet Wardrobe, I'm giving you my own interpretation of classic - center parted hair with side twist braids and lots of volume. 

I paired this look with a elegant, long highwaist maxi skirt from local label OwnMuse that drapes beautifully down the body and even more beautiful when in motion. The long silhouette is complemented with a tight cropped longsleeves top and feminine accessories - light mint jewel necklace and ear studs with hydrangea print court heels.

Here's how to get this look: 
TONI&GUY Classic Look
Tools of the Trade (in order of sequence):
1. Prep - Volume Plumping Mousse
2. Classic - Medium Hold Hairspray
3. Classic - Shine Gloss Serum

  1. Same as last week's tutorial, to damp hair, apply Volume Plumping Mousse liberally to your roots to prepare your hair for volume and hold later on. 
  2. Apply Medium Hold Hairspray to the inner layers of your hair, then immediately backcomb the hair after each spray. This helps to create volume faster than just backcombing and then applying hairspray after. Backcomb until you obtain your desired volume. 
  3. Make a center parting, then grab a small section of your hair and twist it away from your face. Secure it down with two bobby pins. 
  4. Do the same for the other side.
  5. Add some Shine Gloss Serum, concentrating on the ends of your hair, but also throughout your hair.
  6. Finally, using your fingers, scrunch up portions of your hair to 'fluff' it up further, and set the look again with Medium Hold Hairspray
This look is great even for those of you with long hair - you just have to make the side twist braid longer towards the middle of your crown.

What is your interpretation of a classic hairstyle?

If you've enjoyed this tutorial, please vote for me by LIKING my photo on TONI&GUY Hair Meet Wardrobe Facebook page! Your support is greatly appreciated ^_^
Monday, June 24, 2013

Weekend Casual - TONI&GUY Hair Meet Wardrobe

Toni & Guy Nakedgloryvera ii Toni & Guy Nakedgloryvera iii Toni & Guy Nakedgloryvera Toni & Guy Nakedgloryvera iv Toni & Guy Nakedgloryvera v
Wearing Forever 21 cropped tank top, CO. by Cotton On Gold Faux Leather Pleat Skirt, Sandals from online shop, Lovisa ear accessories, Alive & Live Belem Rhinestone Necklace
Photos by Haikel S.

As you should know, your hair completes your look. It changes your face entirely, and it is fundamental to a person's confidence.

TONI&GUY has long been known as an innovator within the hair industry, bridging the gap between high fashion and hairdressing. Their newest addition to their product range is the Hair Meet Wardrobe series. With four different product lines - Casual, Classic, Glamour and Creative - these hardworking, multi-tasking products all serve different needs to meet your wardrobe demands for different occasions.

I've recently taken on Toni & Guy's Hair Meet Wardrobe challenge to create four different look based on their four product lines. So every weekend, I will be posting a hair tutorial on how to style short hair, together with my corresponding look.

For a weekend casual look, I have gone easy separates - a crop highneck tank top balanced off with an A- line gold pleat faux leather skirt. This look is easy to throw on for a trip out with friends, and is also great for Singapore's current hot and hazy weather. To match my outfit, I have chosen to keep my short hair natural looking, but with a bit more texture and movement.
 Here's how to achieve the look -
 
Hair meets wardrobe Casual
 
Tools of the trade (in order of sequence):
1. Prep - Heat Protecting Mist
2. Prep - Volume Pumping Mousse
3. Casual - Sea Salt Texturizing Spray
4. Casual - Flexible Hold Hairspray

  1. Towel-dry your hair first. To wet-damp hair, apply the Heat Protecting Mist, which helps to protect your hair against uneven heat spots during blow-dry.
  2. Apply Volume Pumping Mousse from the roots to the tips of your hair to give it some volume and hold, which makes your hair easier to style into the desired look you want later on.
  3. Use your hair dryer to blow-dry. I'm using my trusty Phillips hairdryer with ionizing technology.
  4. Spray the Sea Salt Texturizing Spray thoroughly from root to tip and then scrunch up your hair as you go along to create natural movement and a more emphasized layered, textured look. This spray is suitable for all hair types and perfect for achieving a lived-in, beach look.
  5. You can use your fingers to backcomb your hair or scrunch your hair up with your fists. 
  6. Finally, finish up with Flexible Hold Hairspray to set in the look.
I love how the Sea Salt Texturizing Spray is so easy to use and instantly creates texture within my hair that looks very natural. If you have long hair, you can finger twirl random sections of your hair and then spray on the product at the twirls to create a tousled, beach hair look.

I hope you try this look out and let me know how it goes for you :)

LIKE this look? Please vote for me on TONI&GUY's page!